
View & Edit Sql Data in a Table
Build an admin panel on top of a SQL database that shows data in a table, and allows users to safely make changes without knowing SQL.
One of Datasiv's capabilities is the ability to spin up admin panels that enable the end user to display, filter and write back to data sources, such as Sql databases.
In this quickstart we'll show you how to build a simple CRUD-like admin console around a SQL database. You will be able to show data from the database in a table, edit a particular entry from the table and write back to the database.
DataSiv provides integrations and read/write capabilities across multiple sourcesAlthough we use a Sql database in this tutorial, you can swap these out with other supported integrations, such as a Rest Api Endpoint, GraphQL, Salesforce, Stripe, etc.
Once this CRUD Panel is built, you'll be able to display data in a table and edit it in a simple user interface without having to write any SQL queries.
.png")
This quickstart requires you to sign up to DataSiv.If you haven't already, please sign up here
To create new applications in Datasiv, we always start by going to the projects page.
On the left hand column, click the Add New App callout on the left hand side.
Type in the App Name (e.g., Crud Panel) and App Url you want (e.g., crudPanel).
Finally, click save. This will take you to the application builder!
Display data from Sql into an editable table
This step will walk you through how to display results from a data query in a frontend component.
We will start by dragging a table, search button and title from the left sidebar into the grid, which we'll bind to javascript and connect to data queries in the following steps.
.png")
We want to enable the end user of our panel to do a wildcard search the SQL table of customers by First Name. Our end SQL query should be similar to `Select * from Customers where FirstName like '%USER_ENTERED_INPUT%'. Therefore, we'll add a javascript transform to bind the search field (where it says Search Here), add wildcard characters to the beginning and end, that we'll then reference in a SQL query.
Transforms, such as the Javascript Transform we're using, allow you to preprocess and postprocess your dataTransforms, such as the one we're about to create, allow you an easy way to mix and merge data sources together, filter them, or write code to get it into the right format before inserting it into a database. You can write raw Javascript, client-side Sql, or other transforms to get started quickly.
Click Add Transform from the top menu, and put in the following code:
let data = '%' + {{data.search0.searchedText}} + '%';
data
This code will automatically be evaluated whenever the searchedText property of the search0 component changes due to Dynamic Binding in Apps.
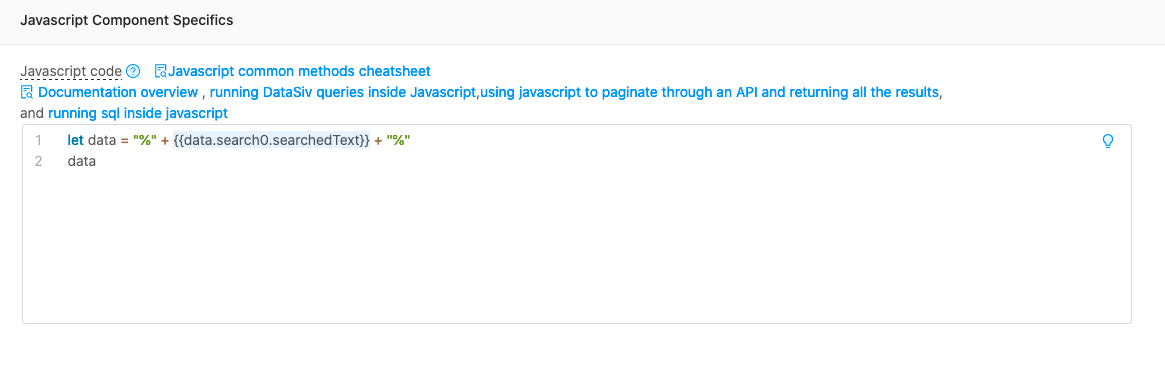
Leave the Automatic Execution property as is. We'll reference the output property of this javascript component, which evaluates to %%.
.png")
Learn more about Javascript components hereThe Javascript Transform page has detailed documentation on how to use javascript in your application.
Great! Now we're ready to write our data query.
Click the Add Data Query option on the top navigation menu, select Sql Api and click Next.
Data queriesThe application builder in Datasiv allows you to write queries to connect various data sources, such as Sql, Rest APIs, and Google Sheets. You can then either call these queries from frontend components such as buttons, or display the outputs of these queries in frontend components such as tables.

As we will be using the (readonly) built in Sql, database, choose the builtin Chinook DB (builtin) (readonly) from the Resource dropdown menu. The database schema is displayed on the right. We will be loading in data from the table called Customers, so for the SQL Query, please write Select * from Customers where FirstName like {{data.javascript0.result.output}}
.png")
Through dynamic binding, this expression will automatically change when the user enters different data in the search fields and presses enter. Since the search field is empty by default, we'll return all customers.
.png")
What are {{}} good for?Based on Django's templated {{}} syntax, the special
{{}}expression allows you to substitute in values from one set of objects in your application to another. For example, in the SQL query above,{{data.javascript0.result.output}}automatically evaluates to '%%'.
Click the next button to go to the Run Options step. This section allows you to name your data query (other components will be able to reference this component via its name) and other options, such as when to trigger the data query.
Set Automatic Execution to On Document Load. This ensures the Sql query will run when the user first enters the application or when any of its parameters change.
.png")
Click Save Query to add your query to the application. Congratulations! You've made your first data query.
Now, we want to display the results of the Sql query in a table, where a user can select & modify rows.
All of the properties of the table are displayed in the right hand sidebar. By editing these properties, we can connect the backend (database query) to the table.
To do, set the Data property of the table to the query you just made.
.png")
How to reference DataSiv components (such as queries)All component properties are stored in a global key value store that other components in the app are able to access. You are able to reference other components using Javascript dictionary terminology.
In this instance, we would like to reference the data property from the sql0 Sql component. All query components are stored under the global queries key, hence, we type in
queries.sql0.data
Great! You've successfully displayed data from a searchable query in a table.
Now, let's enable the user to edit a row in a table.
Drag a button and an input field from the left menu below the table.
.png")
Specifically, we want to enable the user to edit the FirstName column of the table.
To do so, set the Default Text property to {{data.table0.selectedRow.0.FirstName}}. This will dynamically bind the value of the input to the selected row of the table.
.png")
To save changes to the database, we'll be triggering a SQL query from a button. Start by adding another SQL query: Update Customers Set FirstName = {{data.table0.selectedRow.0.FirstName}} where CustomerId = {{data.table0.selectedRow.0.CustomerId}}:
.png")
Make sure to set Automatic Execution to None. We will be calling this query from the button component, and then reloading the data table, so update the button button0's code property to first run queries.sql1, followed by queries.sql0, redisplaying the data in the table.
.png")
Now that our table is setup, we will connect it to the Sql query sql0 we made previously. To do so, in the right hand sidebar menu, below the table property, click the Edit Data button. This will display a menu for you to connect the table to the Sql query.
Select queries.sql0.data as your data source, and click Ok to confirm.

Congrats! You now have a table that is selectable, editable, and is connected to your sql data source.
.png")
Triggering Data Queries from the FrontendButtons and other frontend components provide a convenient way to trigger Data Queries whose Automatic Execution property is set to
Never.
Click View App on the top right to see the production view of your application.
.png")
You've successfully built an application that allows you to display, select data from a table, and edit data into SQL. The same logic will apply for displaying and editing data on top of any data source. In conjunction with Overview, you're able to spin up dynamic application quickly!
.png")
Updated 8 months ago